How to create Docker image manually?
We have learnt basic about docker in previous posts. Today, I am going to create post for How to create Docker image manually.
Creating your own images is useful to perform deployments in large scale environment, using a pre-prepared installation. Lets start How to create Docker Image Manually
Read Our Previous Post :
Working with Docker in CentOS 7/RHEL 7
How to manage Docker containers on CentOS/RHEL 7.x
How to install Docker on CentOS 7.x
Step 1: We will pull the latest CentOS Docker image using docker pull command. Docker pull command is used to download or pull latest image from Docker Hub repositories.
~]#docker pull centos:latest

Step 2:Use below command to check and list all docker images
~]#docker images

Step 3: Use below command and parameter to run docker image, I use following command
-it : This argument is used to allocate a bash shell and take standard input.
– – name : This argument is used to tag a name to the running container.
~]# docker run –it --name GhanshamMahajan-WebServer centos:latest

Docker container started and showing the shell, now nest step to install apache
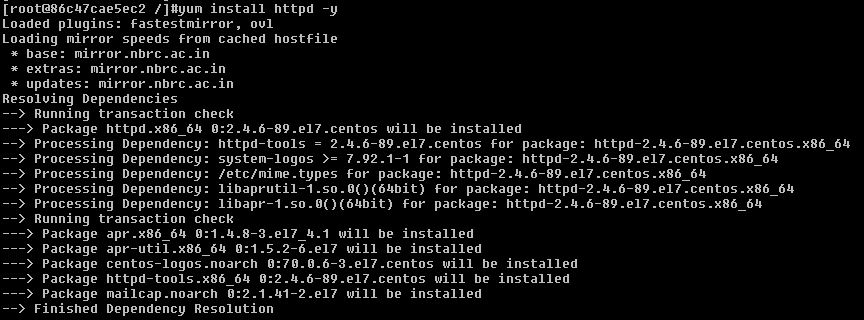
Step 4: Now I am going to install Apache webserver and it’s all dependencies
]#yum install httpd -y
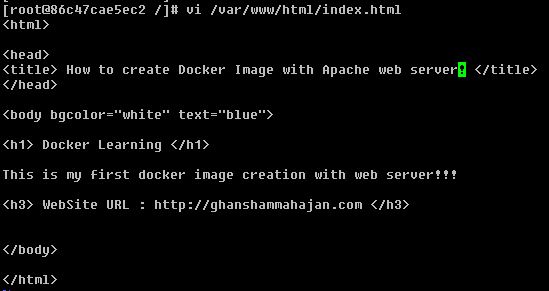
Step 5: Now I am creating a webpage at location /var/www/html/index.html which is apache default location.
]# vi /var/www/html/index.html
Step 6: Exit from the running container using exit command. Exit command will stop the container. Exit command of docker same as power off or shut down of our computer.
]# exit

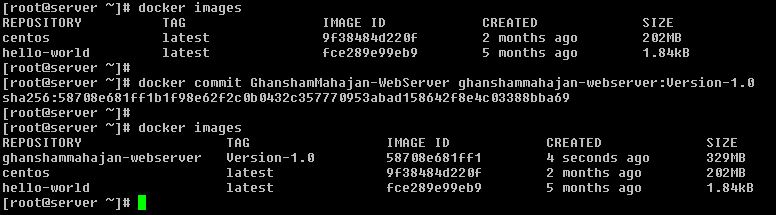
Step 7: Now we have container in which apache webserver is installed and our webpage is configured. We can make a new customized docker image from the stopped docker image using docker commit command. Docker commit command will build our own image.
#docker commit <container_id or name of container will launching> <Name of new image>:<version name>
# docker commit GhanshamMahajan-WebServer ghanshammahajan-webserver:Version-1.0
~]# docker commit GhanshamMahajan-WebServer ghanshammahajan-webserver:Version-1.0
Step 8: Now, I am Launching a webserver container using our customized image.
-p: This argument is used to port forwarding. Which means anybody from outside who comes for 8081 its request is forwarded to port 80. Port 80 is default port number where apache webserver runs.
/usr/sbin/httpd –D FOREGROUND: This argument is command which will run when container is started this command will start the apache web server
~]# docker run -p 8081:80
ghanshammahajan-webserver:Version-1.0 /usr/sbin/httpd -D FOREGROUND

Enter CTRL + C to close the current session will stop the container. Once the container stop you can use below command to start the container.
~]$ docker start e4ad7fab8d61
Step 9: To Check the Result on web browser
http://<host ip>:8081/
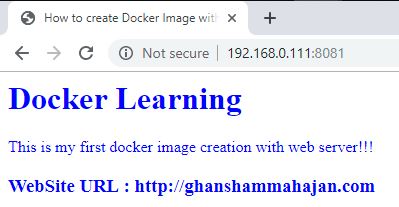
Use your Host IP address and port no. I used 8081 port which will redirect to docker container apache 80 port.
Docker Document Reference : Docker Docs
Hopefully “How to create Docker image manually ”, this will helps your understanding. More post related to Docker